Autumn is a time when it's important to understand the true nature of how plants work. Although we perceive that it is the time of the year when mother nature is slowing down, nevertheless this is a good time to plant. 

Here are a few good reasons why:

  • The temperature is not too hot, that often causes stress to the plants and stress to the gardener when there is often not enough time to get around and water new plants.
  • It’s not too cold yet to stop root growth, for although apparent growth of plants seems halted (no further leaf or flowers produced) this is a good time for root systems to become consolidated, and to become strengthened.
  • It's a good time for plants to become established, ready for a showy spurt of growth when spring comes along.
What to plant?

Trees

It’s good to bear in mind if you have any space for tree planting (or hedge planting for that matter) it's good to plant them during autumn for many reasons:
  • They get established better than in summer with no associated watering problems. ( "What watering problems?” I here you ask!)
  • It is much cheaper to buy bare-rooted stock during this ‘bare root’ season from October to March (dependent on the species of tree).
  • As mentioned above the soil is still relatively warm, giving the tree a good start in its new position.
Shrubs
It’s an excellent time to plant shrubs and you may find that some bare-rooted shrubs are inexpensive, especially many wildlife varieties: hollies, yew, lonicera (the climbing one), as well as many buxus if you are planning a box hedge.

Vegetables
Quite a variety of things can be sown in your vegetable plot at this time: Beetroot, chard, kohlrabi, oriental greens, calabrese, turnips, spinach, spring cabbage, endive, carrots (if fast growing varieties). You could also put in strawberry plants.

Bulbs
Recommended bulb plantings include: grape hyacinths, hyacinths, daffodils, jonquils, ixia, freesia, ranunculus, sparaxis.

Image on the right: Acer palmatum atropurpureum just starting to turn to it's magnificent autumn shades.


Here you can see the stages of surveying a steeply sloping back garden, creating a terraced design to brake up the space into outside rooms and then the process of building the new garden.

The original garden was quite small, but even so had a differential of over three metres from house to back boundary. We created dramatic levels using rendered walling (and the upper wall was actually created using timber sleepers stacked and bolted together, since the upper part of the garden was made of freshly added ground and therefore could not be constructed on with mortar).


As promised in our last post here are images and a short video from one of our latest finished garden makeovers.
At the beginning of this video you can see an original view showing where the hedge and lamppost had to be removed for access to the proposed driveway. The footage then takes you through the demolition phase and on the finished product!

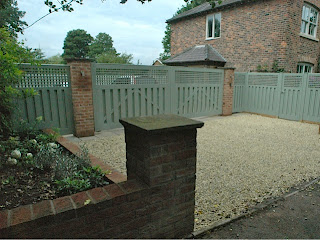
On the left are the stunning new gates, both practical and good-looking. The soft grey/green paintwork and the smooth vacuum treated timber create a welcome alternative to dull traditional gate.
Below is the new entrance and drive under construction shown from another angle. In order to create a level parking area the ground had to be reduced by about 80cms (This can be seen as a wall of soil on the right hand side. This problem was addressed by constructing a dwarf, brick retaining wall.)

On the right is the finished garden shown from the same vantage point as above.


Below shows the original garden ...in need of some refurbishment. The clients requested a fresher more contemporary feel.


The completed scheme (on the left) as viewed from the driveway area.....is both simple and elegant. The crushed Cotswold chippings have been detailed with Indian Stone paving, and the rest of the garden has been simplified giving a more contemporary feel.


Another view (this time looking away from the house) The parking area has been defined within the Cotswold chippings driveway and helps break up what would have been a very large area of just one material.


It’s been several weeks since my last update a Snapshot of our Garden Transformations in Progress and our projects have come a long way! On the left you can see this traditional Cheshire garden (before) has now been stripped, reshaped (below) and is being given a more modern look. 
The renovations need to be completed on the house before we can put down the ipe hardwood deck.
On the same site the new driveway is coming together; here you can see the natural stone border, which surrounds beautiful buff coloured Cotswold stone chippings.


It may not look like much yet, but this terraced garden in northwest Lancashire is taking shape. The top tier will provide a deck with views, the bottom will have a natural stone patio seating area and the middle will bring in colour with lawn and plantings. Below you can see the before image and on the right is the work in progress. 


Check back soon to see photos of the finished gardens . . .

So you've finally got your garden design!

Now comes the really tricky part: getting it built!
Let’s look at the two main ways that you can go about this and some of the advantages and pitfalls of each:
Do it Yourself
The main advantage here is that (providing you have some technical expertise and muscle power!) there will be a great sense of achievement, a feeling that the garden is very much 'yours'.
Of course it may be cheaper, that is as long as you have a good ability to interpret the design properly and avoid making the many mistakes that even experienced landscapers make.
Most landscape schemes are very multidisciplinary, and you would have to be the proverbial 'jack of all trades' to do everything, but using skilled sub-contractors for say brickwork may work well.
You would also need to be aware of health and safety requirements, particularly with regard to hiring in diggers and all things electrical.


Using a Landscaper
Perhaps the obvious choice. Make sure you use a reputable contractor, preferably one who has been recommended. A list can be obtained from BALI (The British Association of Landscape Industries). It’s always a good idea to get competitive quotations from up to three different firms, your designer should be able to prepared tender documents (There would normally be a charge for this).
Be aware that using a contractor your designer recommends is OK, but there maybe some financial arrangement between them. (The designer getting a 'sales commission' that is.) This may be seen as a controversial arrangement, however if the various parties tell the client about this, it is often seen as 'above board' otherwise it maybe seen as non-competitive.
Be aware that cheapest is not necessarily best. A few years ago, when times were hard (wait a minute times are hard now!) I remember quoting to build a medium sized garden (£10,000 I recall), I had gone in very competitively since it was January, I had not much else on. Two weeks later I was informed that a competitor had been awarded the contract for around £5,000. Given that I had worked out that materials were £5,500 (trade price) I was a bit mystified. Some weeks later I had a phone call from the tearful wife saying the landscaper had been desperate for that deposit cheque and had gone in at under cost price just to keep himself afloat and soon abandoned the garden.
Also with landscapers make sure that they have proper terms and conditions, proper, well laid out terms of payment, public liability insurance and written guarantees.
To put the landscapers side for a moment it would be most unfair to expect them to do things not in the contract. Time and time again, I get client’s saying (usually on the first day) "Oh while you're here could you just……..prune that tree". It  can be really unfair, especially as you are trying to create a good atmosphere within your working relationship.
The most common 'extra' to emerge usually quite early on in the contract is to do with a badly drained or waterlogged site. When I first started in business over 20 years ago I was struggling to landscape a really wet garden, using a lot of my own money to put in land drains. I then realised that another landscape firm were doing a similar garden next door. After two days I saw them packing up "What’s up?" I asked "Well" replied the boss, "that garden is too waterlogged to landscape. I asked my clients before I started to get it sorted and so I am pulling off until they do so!" My lesson was learned.
I hope this helps. Happy landscaping!

First off: to save money

"What?" I hear you say.
Well it goes like this: you spend a bit on a well-detailed, well-conceived garden design (well most garden designers charge between £400 -£1,200 pounds for a design. If you are lucky or talented enough designer to have won a few Gold Medals at Chelsea or had you own TV show you probably charge upwards of £1,200 per day for your time).
The thing is, if you have invested money in a good design, you are most likely going to end up loving he scheme when it is finished and it will give you years of pleasure. If it is not well thought out in a masterplan then you could spend far more than the design fee on putting the mistakes right (or even re-doing the schem altogether).
The other things is this: last year I had a young couple come to me for a garden design. They proudly showed me a huge stack of slabs that they had bought in, in readiness with the phrase "we knew they were good cos they were really really EXPENSIVE! ". Well ...NO! Expensive does not equal GOOD! I have some news: CREATIVITY is relatively cheap, compared to acres of the wrong type of slabbing (thats 'flagging' to you if you live north of Birmingham).
You would never try building a house without using a good architect, so why try and build an expensive garden without the garden designer.
Secondly: An Integrated Design
One of the biggest mistakes that people who devise their own gardens is that they over-compartmentalise everything. Example: as a designer I never design a garden with say a lawn over here, a deck over here, some planting over here, etc, etc. I always make sure there is what I call an "Integrated Whole", so that the scheme flows together, it's not always a logical process but one that needs a bit of inspiration.
Time and time again I see the wrong proportion of hardlandscaping vs planting. (OK, a masculine priority vs a feminine one ). If the husband has his way: lots of walling, paving, etc. If the the wife has her way, lots of planting. Getting the balance right is the challenge. Planting is a great 'harmoniser' and will always work best when given a strong structure to work with.

Thirdly: Let's Get Bold
As a designer, I do love raising eyebrows and hearing the question "What?!" when I suggest, for example clearing out some ageing, overmature lavender. Sometimes people get attached to things simply because they have been there for ages, when a good clear out helps create 'an artists empty canvas' and becomes the basis for real creativity.
I love the sharp intake of breath when I suggest, say water in garden or a well thought out, dramatic lighting scheme. I enjoy the process of getting people to 'loosen up' about the idea of change.
It's always a wonderful moment when we have finished a scheme and the client's (or even client's children) start to use their new outside space. I believe that a good well thought out garden can be a great asset to be enjoyed by all.

There has been a hurricane of activity at Garden Magic this spring. We have garden design projects currently covering the entire Northwest: Lancashire, Cheshire, Liverpool, Manchester and even Yorkshire!It is always fun to see the transformations in progress, so here are a few pictures of gardens before and during construction . . . and soon we will share the finished spaces!

Construction is underway in north Manchester (above) as we take what was once plain lawn and create a luxurious space with sleek decking, ornamental pond and contemporary patio, framing a perfect bit of lawn we saved. 
In northwest Lancashire this magnificent home (above, that was once a barn!) has large contemporary windows over looking the back garden. The garden has a steep slope, which we are in the process of using to create a terraced and dramatic landscape mimicking a series of outdoor rooms, for eating, relaxing, and entertaining.  
Just started yesterday, the Yorkstone from this traditional garden space in Cheshire (above) was lifted, making way for the transition to a modern look, with simple, clean lines, defined edges and dramatic vistas.


More updates coming soon . . . 

After the long, but thankfully not too cold winter, the prospect of warm sunny days fills us with anticipation. We have been busy through the fall and winter preparing gardens for spring. And now that we are enjoying a taste of the warm days to come things are getting into high gear as our clients all want to have the perfect garden for relaxing and entertaining this summer.


This time of year, with mild temperatures and moist soil, is the ideal time to put plans for your summer garden in place. Planting and preparation done now will reward you many times over when the sun shines and you want the garden to look its best.

Here you can see the dramatic transformations created with these before and after images of a few of our past garden design and build projects.

One project has a series of spectacular canals and waterfalls in a minimalist setting, another an elemental garden and fish pond, there is a contemporary deck with a beautiful bright green water feature back drop, an Edwardian courtyard made modern and a large family garden that is both stunning and functional.


Check out this recently finished garden complete with waterfeature, garden lighting, topiary, decking and fine cream coloured contemporary sandstone slabs.

The semi-circular deck has been designed using specially machined, tapered hardwood deckboards. This smaller deck is positioned to catch the morning sun...perfect as a breakfast terrace!

The individual topiary standards (photinia 'Red Robin') make an excellent strong statement....each has a stainless steel spike spot uplighter....helping to create drama and atmosphere.

(Planting is complete but needs time to mature)

Sedum is a wonderful option for a green roof being a fairly tough plant that virtually looks after itself.
Some properties of a green (sedum) roof:

a) Helps alleviate flooding by delaying the process of rainwater runoff and so puts less pressure on sewerage systems.

b) Thermal Insulation simply helps create an extra layer and so the room beneath is warmer in winter and kept cooler in summer.

c) Natural habitat for birds insects and animals…they all benefit from a green roof.

d) Aesthetics: it looks good! The only alternative with this scheme was gravel…which intime would have become discoloured with algae. The colours of the sedum roof will change throughout the year providing a truly living roof.
 
This closeup shows the drainage layer with small pvc cells which hold the rainwater providing a steady supply to the root system.


Copyright 2006| Blogger Templates by GeckoandFly modified and converted to Blogger Beta by Blogcrowds.
No part of the content or the blog may be reproduced without prior written permission.